3 Input Data
ADViSELipidomics allows the user to import files concerning different types of data:
- LipidSearch or LIQUID. ADViSELipidomics deals with the data files containing information on chromatographic peak area or peak intensity per lipid, obtained as output from external software for identifying and quantifying lipids (ADViSELipidomics currently supports the output formats from LipidSearch or LIQUID). Moreover, it requires the Target File with details on samples (such as treatments or biological replicates), and the Internal Reference File with bounds for the filtering step in the following modules. ADViSELipidomics shows a quality plot based on the sum of chromatographic peak area per sample (or replicate). In the case of LipidSearch output associated with internal lipid standards, ADViSELipidomics also requires all the Calibration Files for the construction of the calibration curves.
- Metabolomics Workbench. ADViSELipidomics can download in real-time suitable selected lipidomic experiments from the online repository;
- Excel. The user can upload two Excel files: the data matrix and the Target File;
- SummarizedExperiment. The user can upload a SummarizedExperiment R object (SE), with several types of information (data matrix, information on lipids, information on samples, metadata if available).
Hence, as can be seen, ADViSELipidomics requires different files that may change between the various data types. To sum up, here is a list with all the required files for each data type:
-
LipidSearch with Internal Standard lipid:
- Target file (.xlsx)
- Internal Reference file (.xlxs)
- Data files coming from LipidSearch related to your samples (.txt)
- Calibration File for deuterated (.xlsx)
- Calibration File for nonlabeled (.xlsx)
- Concentration files coming from LipidSearch related to the internal standard (.txt)
-
LipidSearch without Internal Standard lipid:
- Target file (.xlsx)
- Internal Reference file (.xlxs)
- Data files coming from LipidSearch related to your samples (.txt)
-
LIQUID
- Target file (.xlsx)
- Internal Reference file (.xlxs)
- Output coming from LIQUID related to your samples(.tsv)
-
User’s Excel File
- Target file (.xlsx)
- Data Matrix File (.xlsx)
-
SummarizedExperiment
- SummarizedExperiment object (.rds)
For Metabolomics Workbench you don not need to import anything, just choose the Metabolomics Workbench ID study.
Before running ADViSELipidomics, make sure that you have all the required files and that they are compiled properly. Apart from the output files from LipidSearch and LIQUID, ADViSELipidomics requires that the Excel files have a given structure with some mandatory columns. Here we provide a guide to the creation of these Excel files.
3.1 Data files (LipidSearch or LIQUID)
The output of LipidSearch and LIQUID are some text files containing information on chromatographic peak area or peak intensity per lipid. If your data come from LipidSearch, you should have a deuterated file and a non-labeled file for each sample (or replicate). The extension of these files should be .txt. ADViSELIpidomics accepts files from LipidSearch version 4.2.29 and beyond (last version tested 5.1.6). If your data come from LIQUID you can have a positive and a negative file (with a .tsv extension). In any case, put your data file in a folder and rename each file with your sample id in a proper way.
Example:
Your sample is called “AF-1C-M” and you have two technical replicates. Then, depending on the output software, the name of the data files should be:
- for LipidSearch: “AF-1C-M_deuterated_1.txt”, “AF-1C-M_nonlabeled_1.txt” and “AF-1C-M_deuterated_2.txt” and “AF-1C-M_nonlabeled_2.txt”
- for LIQUID: “AF-1C-M_positive_1.tsv”, “AF-1C-M_negative_1.tsv” and “AF-1C-M_positive_2.tsv”, “AF-1C-M_negative_2.tsv”
The last two characters (e.g. “_1”) refer to the technical replicate. If you do not have technical replicates just remove these two last characters (so for example in the case of LipidSearch you should have “AF-1C-M_deuterated.txt” and “AF-1C-M_nonlabeled.txt”).
![]() NOTE
NOTE
In the choice of your sample name, it’s better to avoid special characters and DO NOT use underscores (_) . This character is used by ADViSELipidomics to split the file name into three parts: the sample name, the type of file (deuterated/nonlabeled or positive/negative), and the technical replicate as shown in the following picture:
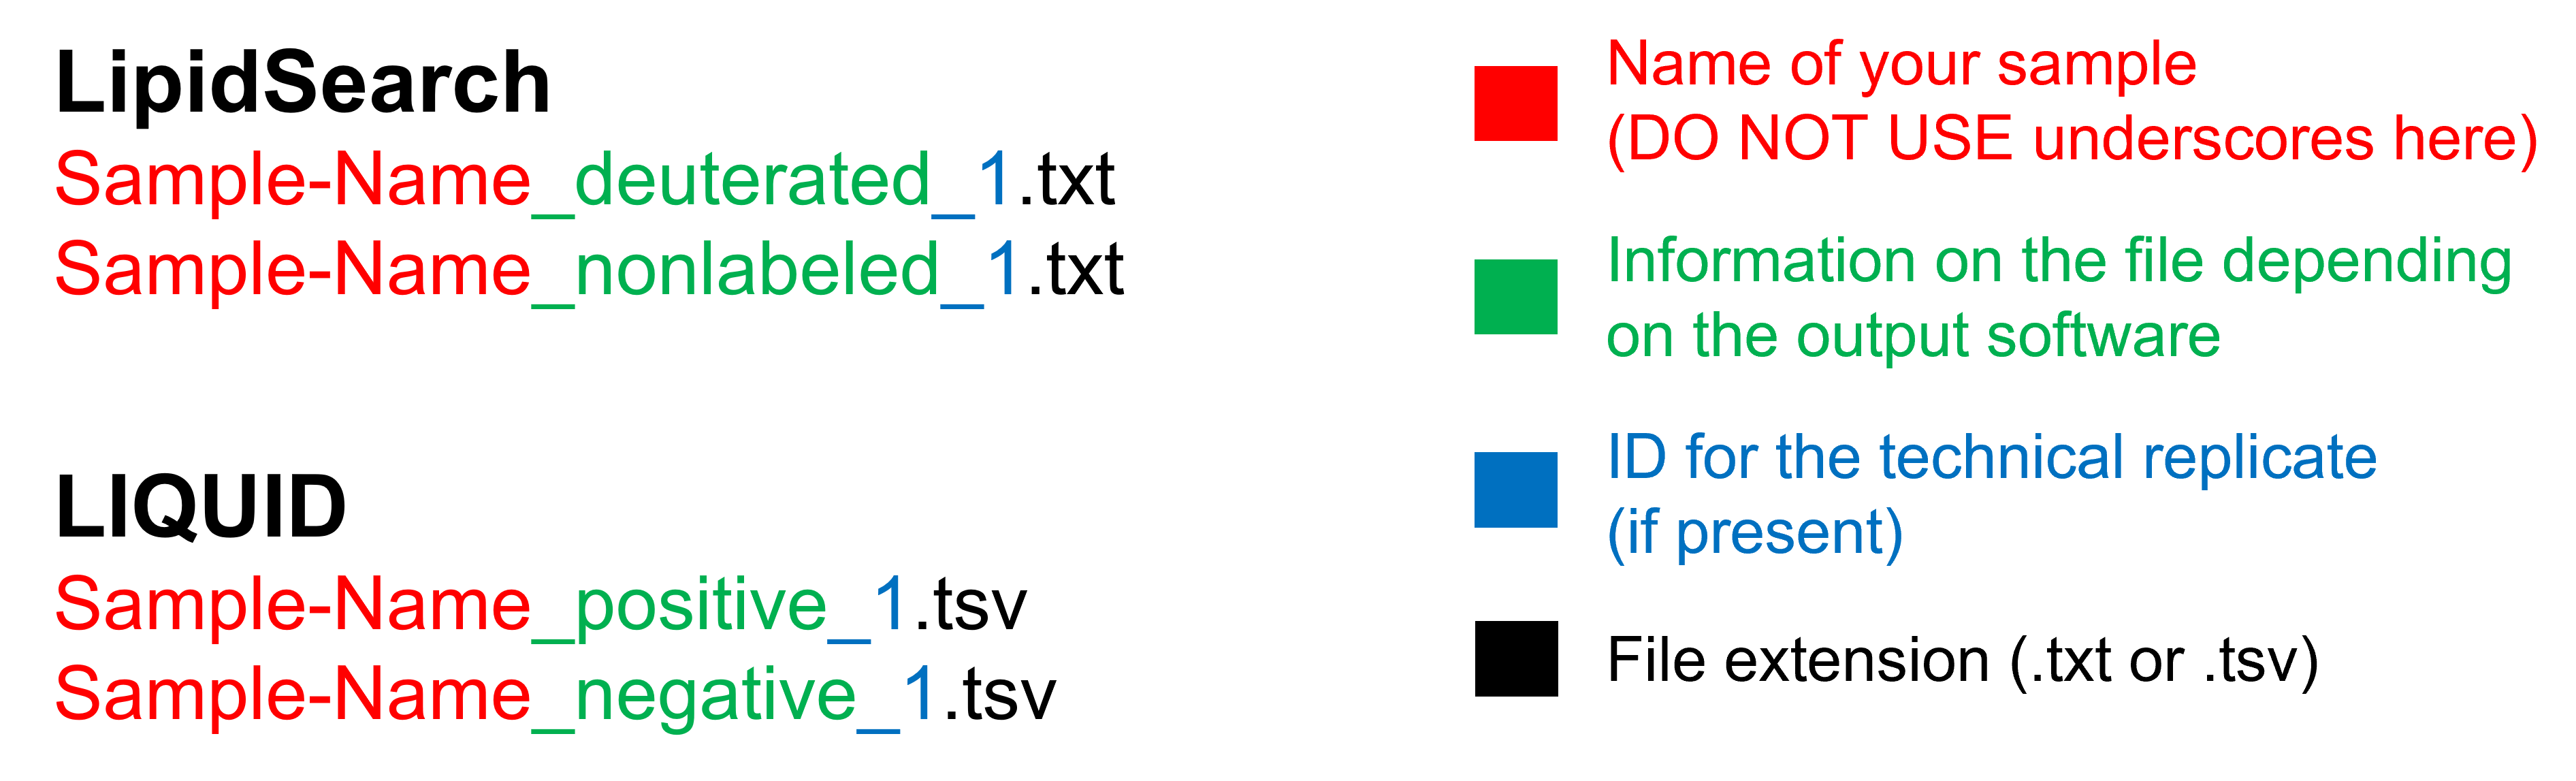
For example, a bad name could be “Blood_bag_deuterated_1.txt”, while a good name is “Blood-bag_deuterated_1.txt”.
3.2 Target File (LipidSearch, LIQUID, and User’s Excel File)
The Target File is an Excel file that contains all the information about your samples. It is the most important file since it is used for LipidSearch import, LIQUID import, and User’s Excel File import. This file requires some mandatory columns that have to be filled with some criteria:
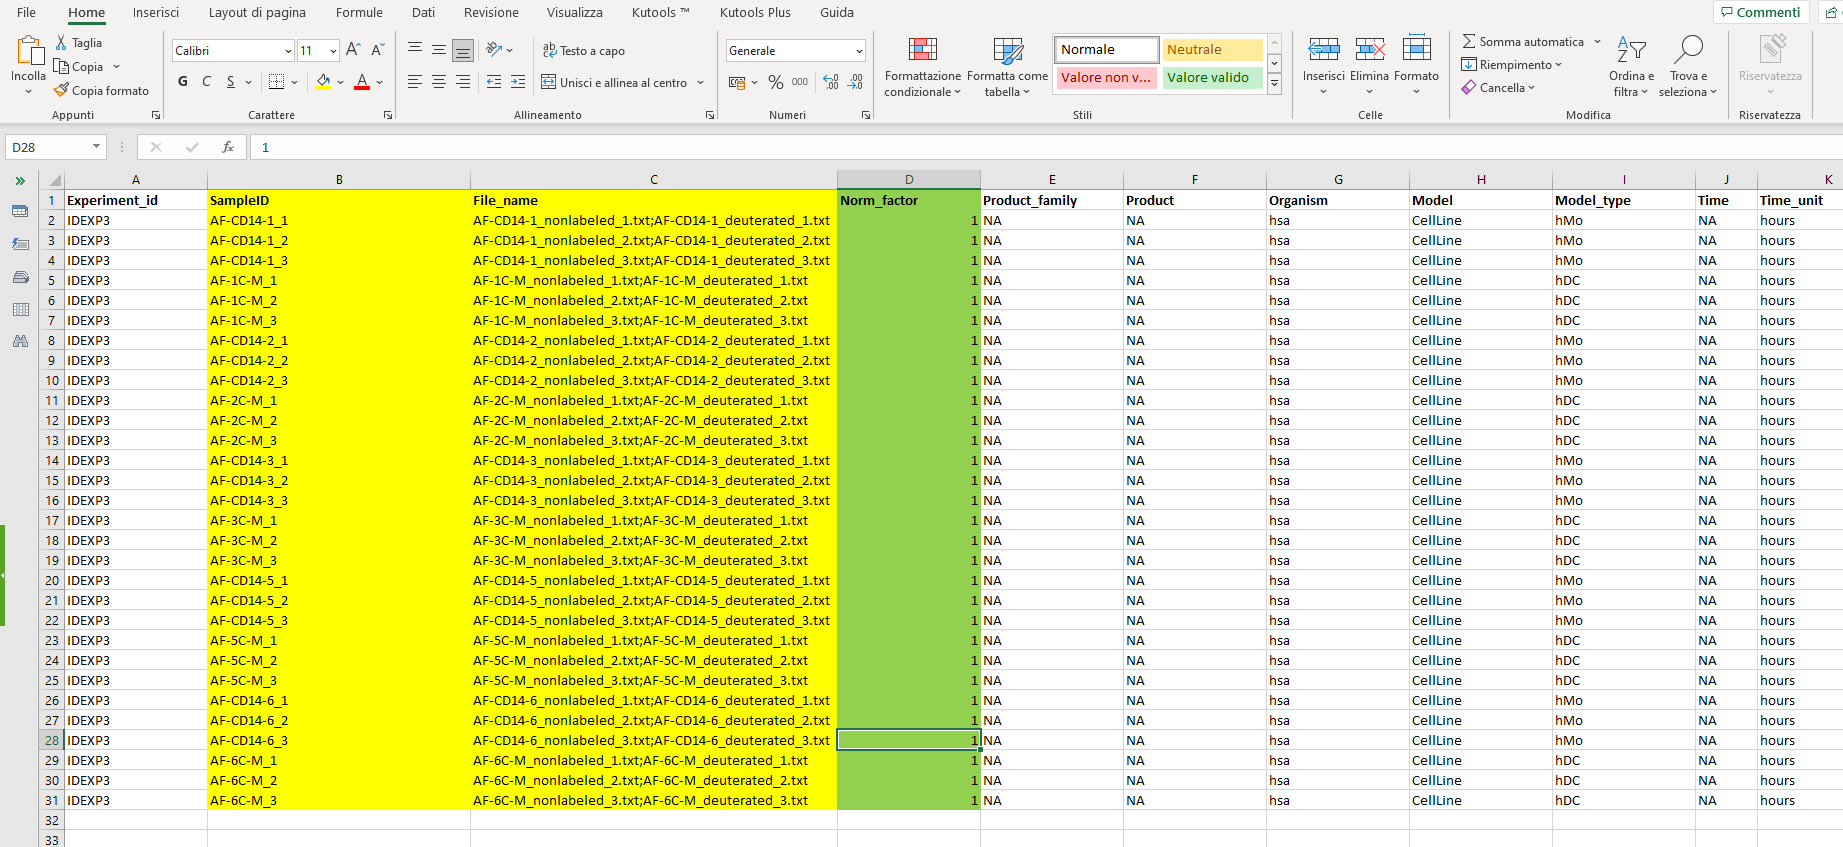
- SampleID (LipidSearch, LIQUID, and User’s Excel) this column contains the ID of each sample. To prevent errors, the best way to write the IDs is: “samplename_1” where in “samplename” you can write your sample name and “_1” represents the identification for the technical replicate. If your experiment does not have technical replicates, you can simply write “samplename”. A good SampleID could be “AF-1C_1” if technical replicates are present, or “AF-1C” if not. A bad name could be “AF_1C_1” (with another underscore).
- File_name (LipidSearch, LIQUID) this column contains the name of the data files coming from LipidSearch or LIQUID. In both cases, for each sample there are two different files. In LipidSearch you have a “deuterated” and a “nonlabeled” file, while in LIQUID you have a “positive” and a “negative” file. Depending on your data type, write both file names in the corresponding cell separated by a semicolon “;” without any space.
- Norm_factor (LipidSearch, LIQUID - optional) If you need to normalize your data by a normalization factor, you can add this column and write a number (be careful with decimal points) for each sample. If it is not present, data will not be normalized.
The picture below shows a Target File example where the mandatory columns are enlightened in yellow and the optional column in green. You can fill the Target File with any other informative column, just try to avoid special characters like \^$?*/|+()[]-{} and whitespace. You can use _ instead of whitespace. For example, a column “Bio_replicate” may contain values like “BD1” or “BD_1” but not “BD-1” (Differential Analysis does not work if there are “-”).
![]() NOTE
NOTE
If your Target File does not contain at least one informative column about the samples (e.g. Product, Model_type, etc.), you can not perform any exploratory or statistical analysis.
The example target file can be downloaded from here:
3.3 Internal Reference File (LipidSearch, LIQUID)
In LipidSearch and LIQUID option, ADViSELipidomics requires also another Excel file here called Internal Reference File which contains the list of the Internal Standard lipids defined per class and adduct, upper/lower bounds for the number of carbon atoms, upper/lower bounds for the number of double bonds, nominal standard concentration, and upper/lower bounds for the concentration linearity in the calibration curves. This file has many mandatory columns that depend both on the external software (LipidSearch, LIQUID) and the presence of internal standards (only for LipidSearch).
-
LipidSearch
- Class lipid class of interest according to the nomenclature of LipidSearch (e.g. DG )
- Ion the ion of interest written according to the nomenclature of LipidSearch(e.g. M-H )
- MinRt minimum retention time of the class (numeric)
- MaxRt maximum retention time of the class (numeric)
- InternalStandardLipidIon name of each internal lipid standard according to the nomenclature of LipidSearch* (e.g. Cer(d18:1_17:0)-H ). It is also possible to use a lipid that doesn’t belong to the same lipid class written in the “Class” column. For example, you can use the lipid PS(18:1D7_15:0)-H for the PG class.
- MinLinearity minimum value for the range of linearity in the calibration curves. (numeric) ONLY IF YOU USE INTERNAL STANDARD
- MaxLinearity maximum value for the range of linearity in the calibration curves. (numeric) ONLY IF YOU USE INTERNAL STANDARD
- NominalStdConcentration concentration of each internal lipid standard initially spiked into the sample (numeric) ONLY IF YOU USE INTERNAL STANDARD
*nomenclature of LipidSearch: LipidSearch nomenclature is very similar to Lipid Maps nomenclature except for the use of underscore instead of backslash between different stereospecific numbering (sn) and the absence of the double-bond geometry. An example of the required nomenclature can be seen in the picture below.
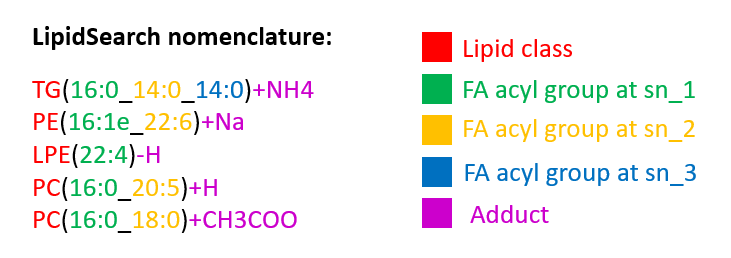
The picture below shows an Internal Reference File example in the case of LipidSearch and the presence of Internal Standards. In yellow are the mandatory columns, and in green the columns needed only in the presence of Internal Standards. The “Unit_measure” column is not used but can be helpful to check that each standard concentration has the same unit of measure. If you have different units of measure, convert them to the same.

The Internal Reference File example for the LipidSearch with Internal Standards option can be downloaded from here:
![]() Internal_Reference_file_LipidSearch_withIS.xlsx
Internal_Reference_file_LipidSearch_withIS.xlsx
-
LIQUID
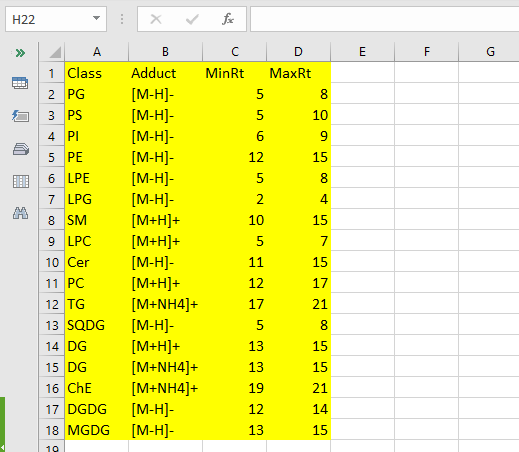
- Class lipid class of interest according to the nomenclature of LIQUID (e.g. DG )
- Adduct the ion of interested written according to the nomenclature of LIQUID (e.g. [M-H]+ )
- MinRt minimum retention time of the class (numeric)
- MaxRt maximum retention time of the class (numeric)
The picture below shows an Internal Reference File example in the case of LIQUID. In yellow are the mandatory columns.
The Internal Reference File example for the LIQUID option can be downloaded from here:
3.4 Calibration Files (LipidSearch with Internal Standards)
In the case of LipidSearch, if you have Internal Standard, you can choose to use them or not. In this case, you need to upload also some Calibration Files which are two Excel Files, and the data files coming from LipidSearch (here called concentration files). The concentration files are the same .txt files described in Section 3.1. Please, refer to that Section if you need more information about how to rename the files. Be sure that all the concentration files are inside a folder and that they aren not mixed with the data files of Section 3.1. Next, ADViSELipidomics, requires two Calibration Excel files, one for the Non-labeled and the other for the Deuterated. They share the same structure:
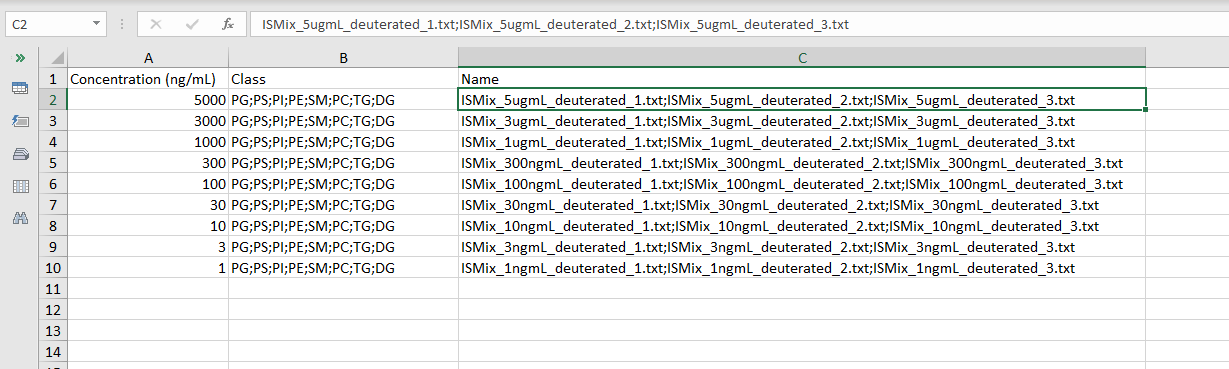
- Concentration (ng/mL) the concentration of the standard (numeric)
- Class the lipid classes of interest separated by a semicolon “;” (e.g. PG;PS;PI;PE;SM;PC;TG;DG )
- Name the name of the data files coming from LipidSearch. They have to match perfectly with the file names. If you have technical replicates, separate them by a semicolon “;” without any space. (for example in the deuterated: ISMix_5ugmL_deuterated_1.txt;ISMix_5ugmL_deuterated_2.txt;ISMix_5ugmL_deuterated_3.txt)
The picture below shows an example of a Calibration Excel file for the deuterated.
An example of the Calibration Deuterated and Calibration Nonlabeled Excel files can be downloaded here:
3.5 User’s Excel File
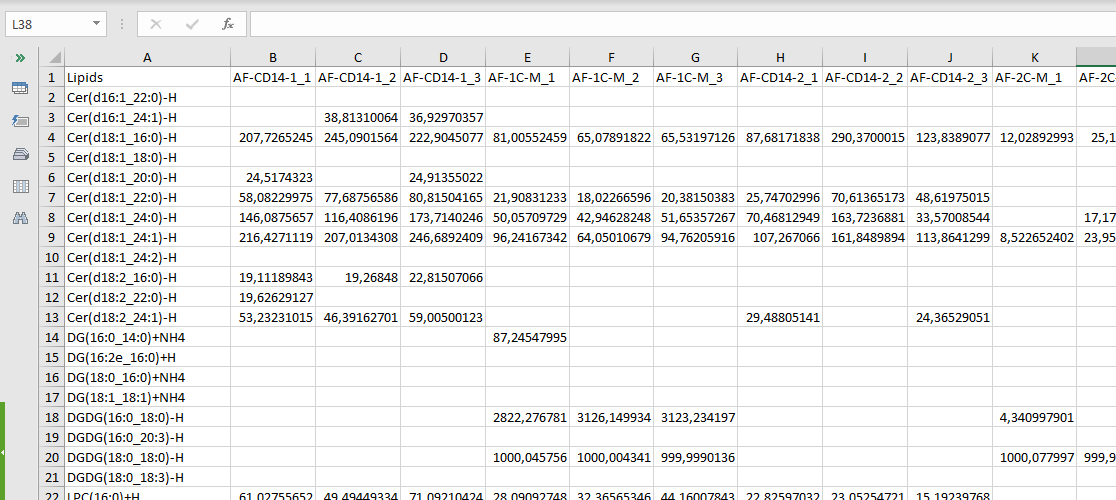
If you already have a matrix file containing the abundance for each lipid, you need just two Excel files: a Target File and a Data Matrix File. Here the Target File has only one mandatory column, the SampleID. The Data Matrix (.xlsx file) must have the list of the lipids in the first column, which must be called “Lipids”, and then the samples (or replicates) in the following columns, with the column names that are the same of the SampleID from the Target File. It is not necessary that the matrix is full (i.e. without missing values) since after uploaded, it is possible to filter and impute NAs. The picture below shows an example of a Data Matrix Excel file.
![]() NOTE
The column names in the data matrix must follow the same SampleID rules described in Section 3.2.
NOTE
The column names in the data matrix must follow the same SampleID rules described in Section 3.2.
An example of the Data Matrix can be downloaded from here:
3.6 SummarizedExperiment
ADViSELipidomics allows the user to load a SummarizedExperiment (SE) object, saved as a .rds file, already prepared or previously downloaded after running ADViSELipidomics. Since the required SE object has a complex structure, we do not recommend uploading a SE object that was not downloaded from ADViSELipidomics. The idea behind this option was that the user can save the SE object after the preprocessing steps and performs the exploratory and statistical analysis at another moment.